
Whether you’re a parent or nanny of one or twenty, making a kids’ school lunch is often time-consuming — and one.more.thing.you.have.to.do. Yuck. Here is a simple trick to organizing your refrigerator so lunches can be more grab-and-go style.
Materials:
- Four clear plastic fridge-storage bins (like these)
- Labels
- Lunch supplies
Directions:
- Have lunch boxes cleaned and set up next to the refrigerator. Also place bread (if left out) right by your fridge.
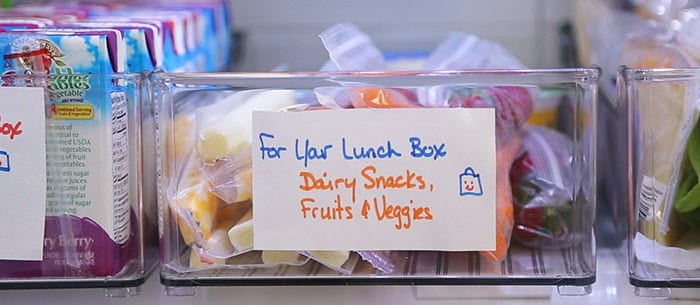
- Take three plastic bins and designate one for cold snacks (yogurt, cheese sticks, fruit, etc.), one for water, juice or milk boxes, and another for sandwich fixings (include condiments you typically use). Make space for these bins to live in your refrigerator — and only be used for lunch items. Label your bins with a lunch box so kids know this food is only for school days.
- Standing in front of the fridge with your lunch box, grab the drink and snack, put them in the bag. Then take out the bin for sandwich fixings.
- Grab your bread and make your sandwich. Put sandwich in the lunch box and the bin back in the fridge.
- Place one last bin or bowl next to your refrigerator for room-temperature snacks, such as granola bars or small bags of cookies and crackers. Throw one in your lunch box before sending it off to school.
To get you started, fill your fridge with the ingredients for these 4 Easy Lunch Box Recipe Ideas.
Katie Bugbee is our global parenting expert and senior managing editor here at Care.com. She has written for Babble, Huffington Post, Newsday and Parenting. A busy working mother, she offers families advice on many parenting dilemmas, from appeasing picky eaters to finding the perfect babysitter.


