By Gabrielle Ocasio
As a single mother of two sets of twins, I have my hands full. They’re very spirited children. Two have been diagnosed with ADHD, and you would not believe how many meltdowns happen daily. I discovered the magic of the calm down bottles after my oldest started to slam doors like a teenager.
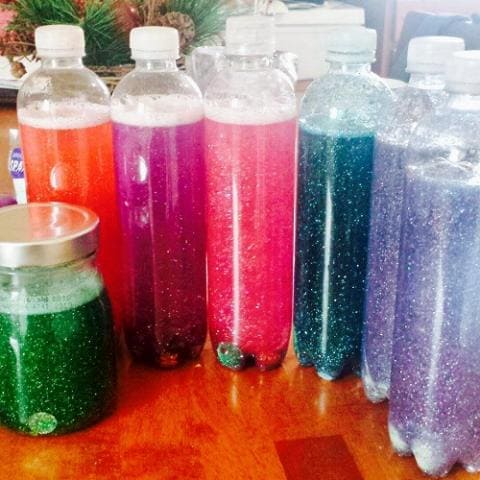
I wanted to help my daughter learn how to calm down when stressed or feeling anxious. I searched the internet for ways to help my child. That’s when I found the calm down bottles, which go by many names including time out bottles, sensory bottles or even just calming glitter jars, but their purpose remains the same regardless of what you call them.
Calm down bottles are a tool to redirect your child in the midst of a meltdown or a tantrum or even relax a child with anxiety. I even made one for myself because what parent can’t use some relaxation. And let me tell you these things work!
Instructions for how to make a basic calm down bottle
Materials:
- 1 or 2 bottles of glitter glue or clear tacky glue.
- Fine glitter.
- Food coloring (not the gel food coloring).
- Chunky glitter or confetti.
- Hot glue gun.
IMPORTANT: If you’re making this for a child, I recommend using a plastic bottle. Any kind works, but I’d stay away from the water bottles with thin plastic. You want something durable that won’t break around an upset child.
Instructions:
- Fill the bottle 1/3 of the way with warm water.
- Next add your glitter glue to the bottle, the amount depends on your personal preference and how quickly you want the glitter to float in the bottle.
- Now add the fine and chunky glitter to the bottle. I bought a multi pack of glitter at Walmart and added some complimentary colors. The more colors you add the more things you’re giving your child to focus on. Now is also the time to add anything special to your bottle. I’ve made some bottles with plastic letters inside that spell CALM. We have confetti in some bottles, and my kids love searching for the shapes inside when they’re relaxing. I even have glow-in-the-dark stars in one bottle, and that is a huge hit with my kids around bedtime.
- Next you can add 1 or 2 drops of food coloring. If the bottle is large, add more food coloring. You can also leave the water clear for a snow globe look. This would work best with the clear tacky glue.
- If you need to add more water to the bottle, do that now. Remember, do not overfill with water. You need some air to make it easier for the water/glue mixture to move around the bottle.
- Finally, to prevent the liquid and glitter from leaking out, hot glue the lid closed.
- Enjoy!
Creating a calm down bottle is a fun activity to do with your kids and a great tool for teaching young kids to self soothe. Feel free to get creative and personalize it however you or your child likes.
When finished, remind your children that they’ve just created their very own calm down bottle. Explain its purpose and how to use it.

My children know when they’re feeling upset, or sad, they need to get their bottles. They play I Spy and will point out everything they can see in the bottle. This helps take their mind off what was troubling them. Once they tell me they’re feeling better, that’s my opportunity to sit down and talk with them (not at) about what upset them.
The calm down bottle has been a huge help with my children at home and at school. I can proudly say my daughter has also stopped slamming our doors!
This article originally appeared on LatinaOnaMission.com in 2015. Posted in 2017 on the MomsRising blog. Republished with permission.